
For part two of this tutorial youll need some more random squares like these again. Two or three or four depending on the sizes you have done. Well just start the second row and see what fits, okay? Things should 'click' sometime soon with where this is heading.
P.S. If youve come looking for the first instalment its here.

step 2. Turn over so 'right-sides' are facing and sew together.
Again, just like we did when we made the first strip.

step 3. Trim off any excess and save if it is a large enough
'off-cut' to be sewn without the machine 'eating' it.

Mine was too thin this time so I wont be able to use it.

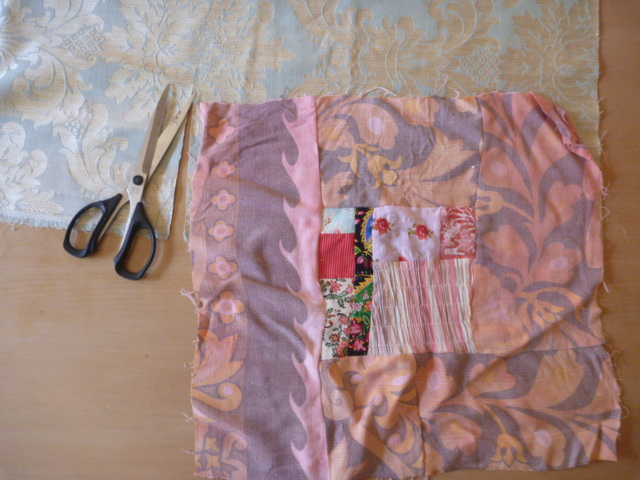
You should have something like this when you place it next to your first strip.

step 4. Now cut through where you want to put a piece of patchwork in.
Wherever looks right to your eyes.
I cut through roughly where the middle of the base fabric is to the side of my 2nd strip.

step 5. Take your odd or smaller squares and slice them in half if they are big enough. We are going to make a strip from them.

If you have two then do both.

I had three smallish odd squares and sliced them all in half.

Place them in the cut you just created and work out how many youll need to 'fill' the gap. If your off-cut was large enough sew it to the side of these.

step 6. Sew them together.
You can add some other fabric to make up the deficit like I have. Then you can save your patchworked squares and they will spread further over the quilt in following strips.

step 7. Trim off roughly.

This is the end of your 2nd strip.
If these are really different in sizing add more pieces,
repeating steps 4-7, until they are close to the same length. Mine are about 150cm long. I am aiming for a single bed size I suppose. Very roughly though, as these quilts just seem to grow as you go.
Please let me know if I have confused you with my made-up terminology
and ill email you with more specific instructions.
Happy quilting!


2 comments:
Looks like heaps of fun and wishing I had the energy to join in. Cherrie
I'm just getting my sewing skills, and I'm so intrigued by the quilting process. Thanks for sharing! You've inspired me to play around with my machine this weekend and see what I can learn.
Post a Comment