Showing posts with label quilt tutorial. Show all posts

Monday, November 22, 2010

quilt tutorial: part four

Before we go any further take stock of all of your offcuts and make sure youll have enough to add in for the next two strips. If you dont have much left what you need to do is cut what you do have in half and add some extra fresh fabrics to the mix. Just a few small pieces will make all the difference. You dont want to get to the last strip to find you have to add in a colour that will look alone or odd as you have only used it once. If you take stock now, you can spread it around and if you have to you can add any fresh fabric to either end to make it 'belong'.

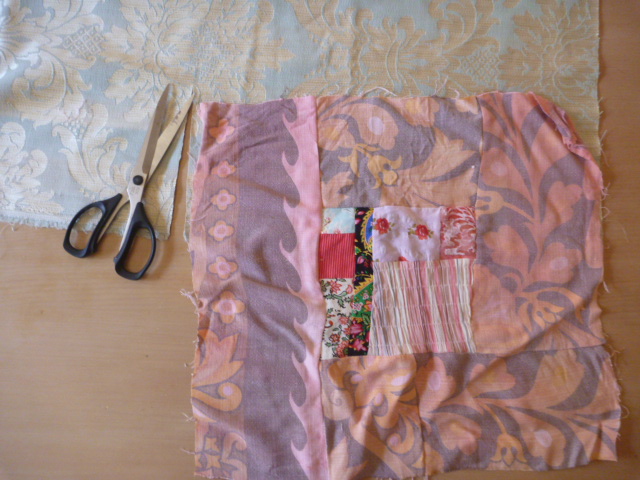
Were going to do another strip beginning how we have up until this point. Cut a slice of the base fabric the same width as your random patch if you have one. If you dont have one left find a large square piece of something you love and add it in, maybe putting a sliver of something alongside first.

Slice into the base fabric again to make a gap for another piece.
Ill be slicing where my scissors show here.

Ive added in a small sliver and even though it is very thin it still breaks
 the base fabric expanse up nicely I think.

I love this fabric and when I added it in I decided to sew the base fabric right side down, so its reversed as in the picture. If you have something that looks good on the reverse side and can do this,
 I recommend it to add interest.

Before you know it youll be doing the next strip. The same deal again.
Im sure youve got the hang of it by now. Keep going, youre nearly finished your random quilt top.

Ive top and tailed this strip to fill in the last corner.

Add a big slice in, not a smaller one this time if you did a small one last time, as you want to finish 'strong' at the final strip to balance your quilt. If you dont have strong edges my opinion is that the eye flows away from
the middle and off the quilt. Im going to cut here where ive placed the scissors on my base fabric.

Heres my choice. There is a bit of cream in my piece
 to blend in with the cream I used already towards the other end.
Here is how mine is looking but I still have more pieces I can sneak in, plus I dont think its quite done yet.
How does yours look?
Do you think it needs that bit of extra tweaking?

I sliced up my last square.

I added a piece to the top left hand corner to fill it in. Cutting down the base fabric first with a rough measure.

Here I added in a piece to the largest expanse of base fabric under the skinny sliver
 I did earlier in this post.

I still have more bits and pieces left so now im checking the overall size of the quilt top to see it hasnt gone skew and ill add some more to the ends to even it up so that it measures equally, within an inch or two, on both sides and ends.

It looked pretty good so I guess these will become the jumping off point of my next quilt.
 Heres the best bit. You can now sew them all together. If youre the really observant type,
which apparently im not, I have sewn the first two rows I did around the wrong way. But luckily, because overall it was balanced in placement it turned out looking fine, if not better. Maybe have a go at switching yours around if youre feeling brave. If not take pictures in between and play with your strips anyway.
I love happy accidents. I have to as they happen often around here at Textured Leaf Central.


I hope youve enjoyed the process so far. Ill be posting the finishing quilting and backing soon. It will be really easy, no basting, just five or ten minutes of pinning and off we go. Promise.

Monday, October 25, 2010

quilt tutorial: part three


Were starting another row just like we did last time but im going to show you a variation on our now recurring theme. A different approach to this next strip, if you will.

P.S. If youve come to find the first instalment of the tutorial click the title of this post and follow back.
If anyone knows how to explain to me how to link them for the sidebar button,
youre welcome to enlighten me. Ive tried and have no clue.

step 1.   Place the strip down and cut out the base the same width, just as you did before.


 step 2.    Were still using the weird little pieces we had from before that we had stitched together to make a couple of rows. If you dont have any left then simply cut a couple of strips in a smaller, thinner strip to use here for this next big strip. Or just quickly run up a couple of fresh pieces. You want it random remember. Anything in the colour choice you made will be good. Go for it. Whatever takes your fancy today. Youll know immediately if its right. You want it to hit you. Dont overthink things at this stage.

step 3.     Here, as you can see, ive shortened the base fabric by half so that our first patched square is ending up sitting in the middle of the quilt instead of at the end like the previous ones. So slice your base fabric in half.


step 4.     Add the half you just cut off to the other side of your patched square like here and then sort out your random strip (or the one you just made).


step 5.     Stitch on whatever it is that your holding in your hot little hands and step back to see how its looking. Its very important for you to see where your eye leads you here. There will probably be something that annoys you and you need to fix it now.


step 6.    To my eyes there was too big an expanse of my base fabric
so im going to cut a split in it and add something.


Im choosing to add one of my big squares and then ill check the length of the new finished strip against the existing ones. They need to stay roughly the same length.

Stitch on and trim when youre happy with what youve chosen to add.


Here you can see the overall effect of how we went back and altered the
 previous strip to accomodate the new one.
This is the variation I was telling you about in the first step.
I think were about the halfway point here.  Congratulations!
Always love getting to halfway dont you?

Monday, October 11, 2010

a quilt tutorial: part two


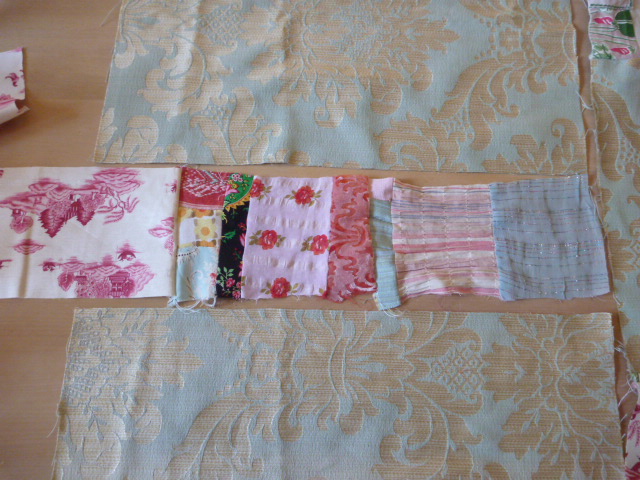
For part two of this tutorial youll need some more random squares like these again. Two or three or four depending on the sizes you have done. Well just start the second row and see what fits, okay? Things should 'click' sometime soon with where this is heading.

P.S. If youve come looking for the first instalment its here.

 step 1.   Place square of patchwork down on base fabric to get the size of the strip you want to cut, just like we did in the very first step. Slice a long strip.

step 2.   Turn over so 'right-sides' are facing and sew together.
Again, just like we did when we made the first strip.

step 3.   Trim off any excess and save if it is a large enough
 'off-cut' to be sewn without the machine 'eating' it.

Mine was too thin this time so I wont be able to use it.

You should have something like this when you place it next to your first strip.

step 4.    Now cut through where you want to put a piece of patchwork in.
Wherever looks right to your eyes.
I cut through roughly where the middle of the base fabric is to the side of my 2nd strip.

step 5.   Take your odd or smaller squares and slice them in half if they are big enough. We are going to make a strip from them.

If you have two then do both.

I had three smallish odd squares and sliced them all in half.

Place them in the cut you just created and work out how many youll need to 'fill' the gap. If your off-cut was large enough sew it to the side of these.

step 6.  Sew them together.
You can add some other fabric to make up the deficit like I have. Then you can save your patchworked squares and they will spread further over the quilt in following strips.

step 7.   Trim off roughly.


This is the end of your 2nd strip.
If these are really different in sizing add more pieces,
repeating steps 4-7, until they are close to the same length. Mine are about 150cm long. I am aiming for a single bed size I suppose. Very roughly though, as these quilts just seem to grow as you go.

Please let me know if I have confused you with my made-up terminology
and ill email you with more specific instructions.

Happy quilting!
Related Posts with Thumbnails