Showing posts with label white. Show all posts

Wednesday, October 6, 2010

cupboard


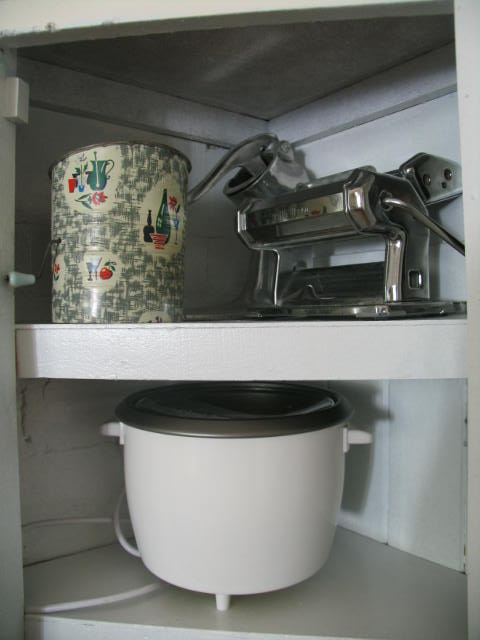
That cupboard I painted white came in handy.

Its now home to all of those electrical gadgets that I use every once in a while.
Im so glad I bothered as it came up nicer that I thought.
Painting inside things is a bit of a nightmare.

Wednesday, September 1, 2010

villa renovation part four

Another instalment in the villa renovation series. This time its the main bedroom and ensuite. This room was two and we knocked out a middle wall to create one large bedroom. The two existing rooms were small and dark and barely fit anything in them, trust me. Or simply scroll down..


We added glass leadlight doors to make the most of the available light throughout the house.
Plus im a bit obsessed with glass doors. These happened to match (there is one at either end of the room, we didnt block one door in when we took out the wall). Plus the bonus was that they werent see through, the glass was mottled.


The wall was taken out here in the middle of where the bedhead now sits.


The windows were painted a very chocolatey black. Thanks to the kids for taking these photos or id have none to show you. Sorry about the child being in the way of the architecture!


This gives a good indication of 1. how crazy/funny my daughter is and 2. how dark and gloomy the room was even when the fluoro light was on. You can spot the original central wall here to the left. Again about the wall, but the rooms were tiny!


same room, some brickwork in the background, same window


and another. Yes, I let the kids have full decorating rights pre the reno.


This is the other room on the other side of the wall. This room was the larger one of the two.
The central wall again is the one with the posters on.
I hope this gives you a glimpse of what we started and finished with.

Anyone else doing a renovation project please leave me a link in the comments.
Id love to take a peek


Monday, June 21, 2010

found

loft

A while back I posted about our house renovation. I was new to this and began the post hoping to inspire someone, anyone, with the transformation only to discover I couldnt find the complete set of photos in order to give the full impact. Well, I found the photos under my sons bed while preparing for my recent overseas and interstate visitors! So here is the first installment of a better attempt at the power of white paint. 
Now, you need to know that we were pretty gung-ho with our approach.
When we viewed the property for the first time we knew it had to be white from top, where ill begin, to bottom.

You can see why.


This is a photo of the real estate brochure ad so its pretty poor quality sorry.
I wont post them all today in case youre here looking for an update on Malis quilt,
(its coming along nicely thanks for asking)

Hope you had a lovely sunny weekend

Saturday, February 20, 2010

even more white in the country


More 'White in the Country'.
Our renovation in Warburton, Victoria.
Above is the staircase after just being constructed and in a very raw state, complete with problem plumbing pipe from the ensuite that would have to be dealt with somehow.


If I knew it was going to look this good I probably wouldnt have taken months to finish it. Two bug infestations later. In forty degree heat. After the first coat of lime wash. If youve ever limewashed anything this means that if you sand back anything (meaning hardened bug carcases) it alters the wonderful effect you were trying for and you risk it looking whited out completely. May as well have just painted it plain white to begin with. Much simpler. I consider myself lucky.


This gives you a great indication of how I tackled the pipe. I couldnt bear to waste the space I had gained so opted to build (yes me on my lonesome) a decent sized linen cupboard. I was going to put a door on it but it really looked homely just the way it was.

This is a close up of the ugly cumbersome stair rail that we inherited with this place. These are in way too many australian homes if you ask me. The two lower bars were removed and we painted it white. (They are normally in dark stain wood look)

Here you get a glimpse of what we were dealing with and the sheer darkness of the wood stains.


A good friend built this over a weekend and he gave us a crash course in welding (my hubby had done it before but I hadnt). Im totally hooked especially with the forging part. It happens very quickly and you almost cant believe your eyes. Beautiful curves made by fire.This ended up costing only $340 for the steel. Although we did have to purchase the welder as well. 

I hope to inspire you to deal with ugly features that you want to change around your home. It took us three long years to decide to take the plunge with the stairs. I wish we had done it the very first weekend!


Friday, February 5, 2010

more white in the country


Originally the stairs were at the other end of the room and their was a wall across,
 dividing the entry from the actual kitchen.  A close friend flew down from nsw to show us how to weld and helped us do the staircase. We had to fire up the forge that we had never used and it was the best fun Ive had bashing the steel into a beautiful artisan style curve. (see before shot below)


These arches were not original we built in the pantry cupboards and put in a narrow window seat.
Below shows before the window seat and the window frame still unpainted as we considered keeping the black for dynamics.


The cupboard in the island was an old buffet we picked up at a country auction for $275
and we built the whole island from scratch around it. The view in from the lounge decided the central placement to the doorway, in order to hide any kitchenalia.


While we had no lighting during the renovation we cooked by lamps plugged in to sockets,
the nice ambience of which I missed when we finally put the lights in about 8 months later.


This is the before shot and its the only one I can find, sorry im standing in the way. We didnt take many shots of the room when it was dark and ugly, you see. Plus we were too busy ripping it apart to bother with a camera.
I glad my son took this one.
Its the before I had drunk my Guiness shot...
 before I had probably taken my end of day shower and washed my hair after renovating ....
before I had considered doing a blog and that this would be used as a photo too
Im pretty certain the pink number im wearing is my pyjama top donned at the beginning of the day!

Sunday, January 31, 2010

the power of white

I was so inspired by the image of Eleesas lounge room and how she puts together her rooms. She speaks to us about painting her room white.  I wanted to inspire back with shots of our country house renovation. Especially the power that simple white paint can have

lounge ceiling before

lounge ceiling after
plus a new central chandelier

looking from the lounge into the kitchen
before painting the doorframe and ceiling


after

looking from the kitchen into the lounge
during rendering the brick walls

the same view after painting and rendering


If you have painted something white recently (even if its not an entire house) Id love to see it!
 Dont hesitate to link back to here. Lets get out our paint brushes ladies!
Related Posts with Thumbnails