Showing posts with label patchwork. Show all posts

Monday, October 25, 2010

quilt tutorial: part three


Were starting another row just like we did last time but im going to show you a variation on our now recurring theme. A different approach to this next strip, if you will.

P.S. If youve come to find the first instalment of the tutorial click the title of this post and follow back.
If anyone knows how to explain to me how to link them for the sidebar button,
youre welcome to enlighten me. Ive tried and have no clue.

step 1.   Place the strip down and cut out the base the same width, just as you did before.


 step 2.    Were still using the weird little pieces we had from before that we had stitched together to make a couple of rows. If you dont have any left then simply cut a couple of strips in a smaller, thinner strip to use here for this next big strip. Or just quickly run up a couple of fresh pieces. You want it random remember. Anything in the colour choice you made will be good. Go for it. Whatever takes your fancy today. Youll know immediately if its right. You want it to hit you. Dont overthink things at this stage.

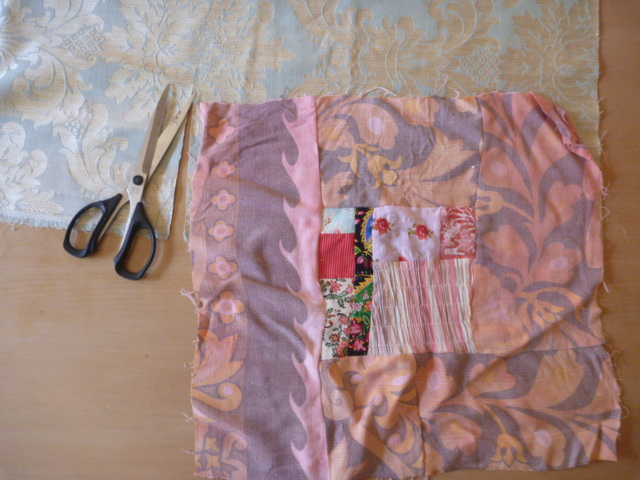
step 3.     Here, as you can see, ive shortened the base fabric by half so that our first patched square is ending up sitting in the middle of the quilt instead of at the end like the previous ones. So slice your base fabric in half.


step 4.     Add the half you just cut off to the other side of your patched square like here and then sort out your random strip (or the one you just made).


step 5.     Stitch on whatever it is that your holding in your hot little hands and step back to see how its looking. Its very important for you to see where your eye leads you here. There will probably be something that annoys you and you need to fix it now.


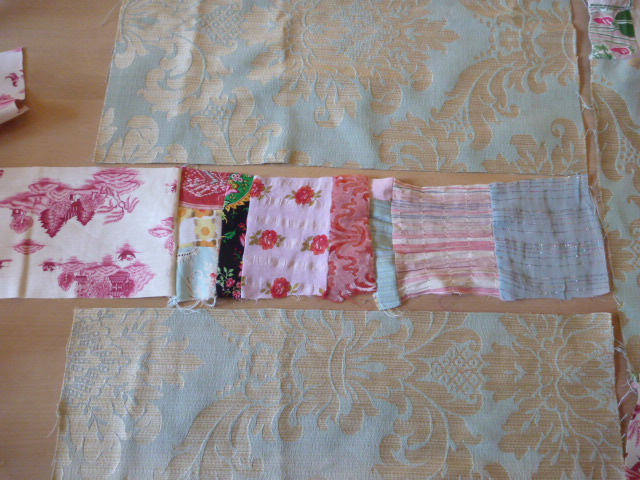
step 6.    To my eyes there was too big an expanse of my base fabric
so im going to cut a split in it and add something.


Im choosing to add one of my big squares and then ill check the length of the new finished strip against the existing ones. They need to stay roughly the same length.

Stitch on and trim when youre happy with what youve chosen to add.


Here you can see the overall effect of how we went back and altered the
 previous strip to accomodate the new one.
This is the variation I was telling you about in the first step.
I think were about the halfway point here.  Congratulations!
Always love getting to halfway dont you?

Thursday, October 14, 2010

my creative space


Today was the 2nd to last day to send the Earthquake blocks to New Zealand.
Here are mine.
I had a bit of an issue trying to stay with red and blue fabrics, I always have trouble sticking to a palette, but they are on their way to you, Deb.

Other spaces here.

Have you seen my new giveaway?

Monday, October 11, 2010

a quilt tutorial: part two


For part two of this tutorial youll need some more random squares like these again. Two or three or four depending on the sizes you have done. Well just start the second row and see what fits, okay? Things should 'click' sometime soon with where this is heading.

P.S. If youve come looking for the first instalment its here.

 step 1.   Place square of patchwork down on base fabric to get the size of the strip you want to cut, just like we did in the very first step. Slice a long strip.

step 2.   Turn over so 'right-sides' are facing and sew together.
Again, just like we did when we made the first strip.

step 3.   Trim off any excess and save if it is a large enough
 'off-cut' to be sewn without the machine 'eating' it.

Mine was too thin this time so I wont be able to use it.

You should have something like this when you place it next to your first strip.

step 4.    Now cut through where you want to put a piece of patchwork in.
Wherever looks right to your eyes.
I cut through roughly where the middle of the base fabric is to the side of my 2nd strip.

step 5.   Take your odd or smaller squares and slice them in half if they are big enough. We are going to make a strip from them.

If you have two then do both.

I had three smallish odd squares and sliced them all in half.

Place them in the cut you just created and work out how many youll need to 'fill' the gap. If your off-cut was large enough sew it to the side of these.

step 6.  Sew them together.
You can add some other fabric to make up the deficit like I have. Then you can save your patchworked squares and they will spread further over the quilt in following strips.

step 7.   Trim off roughly.


This is the end of your 2nd strip.
If these are really different in sizing add more pieces,
repeating steps 4-7, until they are close to the same length. Mine are about 150cm long. I am aiming for a single bed size I suppose. Very roughly though, as these quilts just seem to grow as you go.

Please let me know if I have confused you with my made-up terminology
and ill email you with more specific instructions.

Happy quilting!

Tuesday, October 5, 2010

a quilt tutorial


I thought id finally give you the tutorial on how I make my very unconventional quilts! Heres what youll end up with if you want to quilt along with me. I just have the quilt top to show you at this stage as ive run this up today so I can post it in four parts over the Blogtoberfest.
Do you want to try and make one with me?
 You could wait until the weekend to start if you like. Next monday ill post the second instalment and then consecutive mondays thereafter.


All youll need to get going this week is to do some random squares as ive done here. Mine is roughly 30cm by 30cm. Or perhaps just do one to start with.  They dont even need to match in size or colour too much, but obviously they need to not clash horrendously. So when you have your one random square, it can be any size you end up with, choose about a metre to a metre and a half of a base fabric that you LOVE (you pretty much need to love it if youre going to use it on a quilt as youll be staring at it for years). Ive gone with this classic aqua brocade which was a leftover from some curtains.
Here we go.

step 1.

Place your patchworked square on the corner edge of your chosen base fabric and slice a strip from selvedge to selvedge across the fabric the same width.


Trim any unruly pieces from your square as you go along and save these off-cuts.

Step 2.

Place right-sides together and sew along the short edge adding your square to the end of the strip.


Trim again now and save your off-cut for placing in randomly. If you dont have any off-cuts grab a piece of fabric that you love the look of with your base fabric and cut a sliver (any size wide) of it the same length of the slice you cut into the strip. It could be a fat quarter, a craft print, a piece of silk, a piece of hem you just cut from the summer dress you just shortened or whats left of your sons favourite pyjamas that he has grown out of.
 Again.
 You must love it and it must 'go'.
Skip to step 4 if you dont have any off-cuts. I always have off-cuts though.

step 3.

Join any off-cuts together if they are wide enough to sew together without being 'eaten' by the machine. Mine are about 2 centimetres wide.

step 4.

Slice through the base fabric at random or roughly in half like I have. It doesnt matter where at this point.

step 5.

If you dont want, or like the look of, a thin piece of fabric here you can add a piece of another favourite
 fabric to the side of your off-cuts. Some fabrics look nice sliced thinly and others look 'lost'. Stitch it in the centre of the slice.

step 6.

Stand back and admire your handiwork. You have a week to 'find' the rest of what you want to add to your masterpiece. Get busy making some more patches if you can.
They can be simply three fabrics joined in strips or complex, but remember this is meant to be fun.

Happy sewing!


P.S. Next instalment here.

Monday, October 4, 2010

a quilt


I started this quilt a while ago but im still loving the pieces. And I dont truly know where its heading other than that I love it.
Above and below are two squares left over from my grand-daughter, Mali's quilt.
Yes, I have quilt leftovers because thats the way I do it. I make a few squares and join them together and sometimes I make too many, sometimes I make too few. This time it seems as if I have an odd number, too few it seems, of the pinkier ones. It was a vintage tablecloth that I hand dyed and ill never find the same one again so theres no option of repeating more.

I like the background cloth with these squares so have put it behind all of the shots and perhaps this will give me an indication of how much of it to use to tie it in.


I sewed these while I was waiting by the sewing machine for Mr TL's design process as he was sorting his quilt out one day.


So its almost an accidental quilt. I was a bit bored, while he deliberated.


I had my stash at the ready and just pulled out whatever took my fancy.


 I added the pink edges later in the day.
.

Then ran out of pink and still have three middles.


So now it seems I need to make a decision and get on with finishing it.
Ill post about the process as soon as I have one figured out.


Thursday, April 8, 2010


Another room from Country Living. Take note of the easy patchwork cushion and the mixture of unusual colours together. It works dont you think?

Tuesday, January 26, 2010

quilt-along

Have you heard the good news over at Soulemama?
I Have To Say is hosting a fantastic quilt-along and ive found it just in time to see the first weeks to-doings.

Im going to add these fabrics to the one I have already started for Mali, my grand-daughter. Im slicing into it as we speak. I blogged about this piece I had started here. It seemed silly to start a new one ( i hope thats not cheating, ladies)

a neat stack
 and then
 I start throwing them around to see if I want to delete anything

nothing so far

I especially love the unexpected black

and the small pieces of coffee for a vintage feel.

 Its never too late to join in though if you need to think about it for a bit longer or, like me, your kids arent back at school and you have the book/uniform thing happening this week.

Be sure to check it out before you make up your mind!
Related Posts with Thumbnails